Cilantro Sultana Mini Pies: Golden Raisins, Honey and Lemon

Cilantro Sultana Mini Pies (62)

I realize that cilantro falls into the same polarizing category as coconut, licorice, and raisins: for everyone that loves it, someone else hates it with a passion — whether it’s simple preference or genetics that cause the disdain. (If you aren’t a fan, please return for a cilantro-free recipe in a few weeks.)  As for me, I was in college when I first fell in love with fresh cilantro. The enamorment started somewhere between my visits to the shady but addictive burrito shop (which was open until 3AM) and my casual cooking lessons with my roommate’s family, who came to visit from Honduras from time to time.

Cilantro Sultana Mini Pies (33)

In spite of my love for cilantro, I never really thought I’d turn it into a dessert.  For one, I wouldn’t want to bake it into anything, as its flavor disappears and changes when heated. Plus, I couldn’t imagine it any better than it was as a savory herb.  But then I brought home a bag of tangy golden raisins that I’d planned make into hamantaschen filling.  Mindlessly unpacking the groceries and sampling all the way, I ended up with both cilantro and sultanas in my mouth at once. To my delight, the harmony of flavors sparkled! Golden raisins and fresh cilantro were a marvelous match, perfect for a new dessert. Instead of cookies, my sultanas became an unbaked honey-herb filling for tiny pie crusts made with cornmeal and lemon: a splendid celebration of cilantro as a sweet.

Cilantro Sultana Mini Pies (makes 15 mini-muffin sized pies, with plenty of extra filling to use anywhere you’d spread jam or preserves)

FOR THE FILLING (makes about 1 and 2/3 cups)

  • 2.5 cups (about 12 ounces) Cilantro Sultana Mini Piessultanas or golden raisins, divided
  • 2-3 medium lemons, preferably Meyer
  • 10 grams fresh whole cilantro leaves, rinsed and dried with stems discarded (about 1/3 cup leaves, well packed but not smashed)
  • 3 tablespoons honey

Look closely through the raisins and remove any wayward stems. Place 2 cups (about 9 ounces) of the raisins in a small to medium saucepan, setting aside the remaining half cup. Rinse, dry, and finely zest the peel of one lemon; set zest aside for crusts. Juice the lemon and strain the juice. Repeat juicing and straining with the second and, if needed, the third lemon — stopping when you have a total of 1/2 cup lemon juice.  Pour juice over the raisins and bring to a low/medium heat. Let gently simmer until most but not all of the juice is absorbed, about 6-10 minutes.  Remove from heat and let cool to room temperature.

Cilantro Sultana Mini Pies (5)Place cooled raisins in the bowl of a food processor along with the cilantro leaves.  Process with blade attachment for about a minute, then stop to scrape sides and bottom of bowl. Repeat 2 or 3 times, drizzling with the honey as you do.  Stop when honey is evenly distributed and even, small pieces of raisins and cilantro have formed (large leaves should not be present).  Mixture will be sticky and thick.  Remove from food processor and fold in the reserved half cup of whole sultanas, stirring until evenly dispersed.  Cover and chill until ready to use.

Cilantro Sultana Mini Pies (21)FOR THE MINI PIE CRUSTS (makes 15):

  • 1/3 cup (2.75 ounces) frozen unsalted butter, cut into 8-12 pieces
  • 3/4 cup plus 3 tablespoons flour
  • 1/2 teaspoon salt (reduce to 1/4 tsp if butter is salted)
  • finely grated zest of one lemon
  • 1 egg yolk
  • 1/2 teaspoon pure vanilla extract
  • 2 tablespoons honey
  • 1 tablespoon yellow corn meal

Preheat oven to 350 F.  Grease cups of a miniature muffin pan; set pan aside.  Place frozen butter pieces and flour in the clean, dry bowl of a food processor.  Pulse for just a few minutes, until fine crumbs have formed and no large butter chunks are present.  Stop food processor, add all remaining ingredients, and pulse again just until combined. Dough will still appear crumbly, but it will hold together when squeezed in the palm of your hand.  Resist the temptation to overmix it.

Cilantro Sultana Mini Pies (49)

Separate dough into tablespoon-sized pieces, weighing 20 grams or 0.7 ounce a piece; you should have 15.  Roll each piece into a ball, flatten slightly, and press into greased mini muffin pan, pushing up the sides and pricking the bottoms gently with a fork (not all the way through).  Bake for 16-18 minutes; edges will be quite golden brown.  Remove from oven, let sit in pan for just a few minutes, and then use a fork to carefully tilt each crust to allow airflow beneath it. Let crusts fully cool before filling, storing cooled crusts in an airtight container if not filling the same day.

Cilantro Sultana Mini Pies (70)

TO ASSEMBLE THE PIES:  Fill each cooled pie shell with a generous scoop of sultana-cilantro filling (at least a tablespoon per pie).  If desired, sprinkle tops of pies with sifted powdered sugar.  For the brightest flavor, eat on the day they are made.  Store them covered and refrigerated until ready to eat, finishing them off within a day or two.

Cilantro Sultana Mini Pies (112)

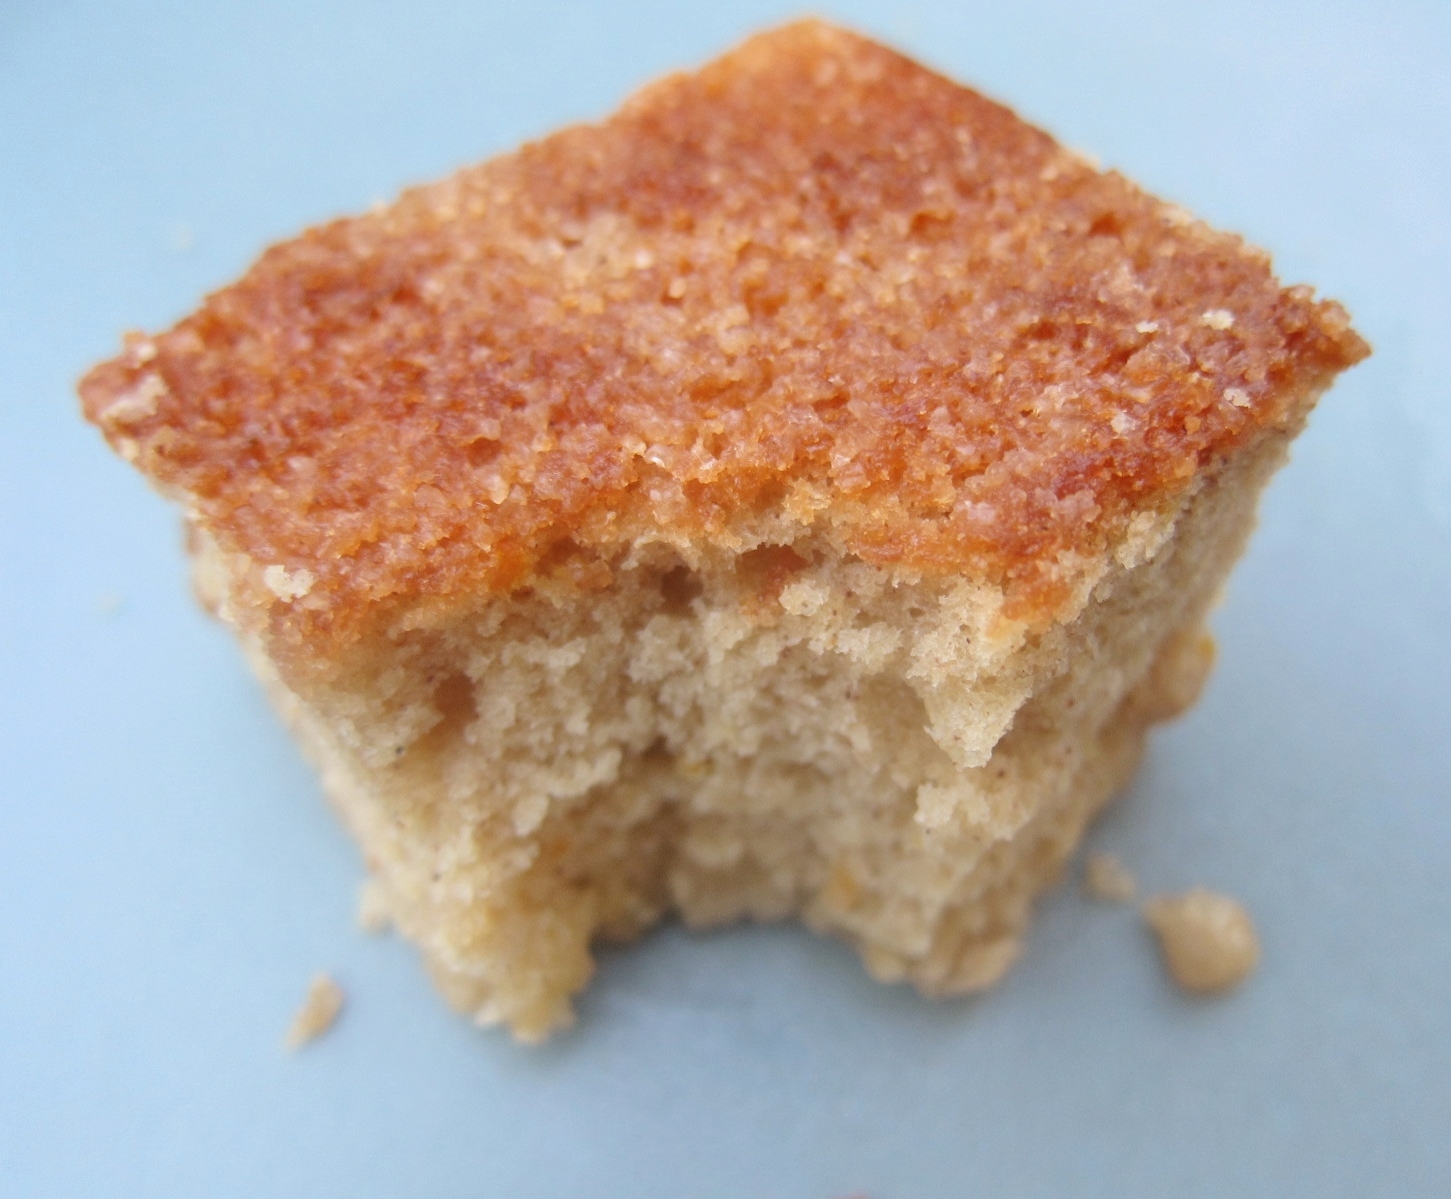
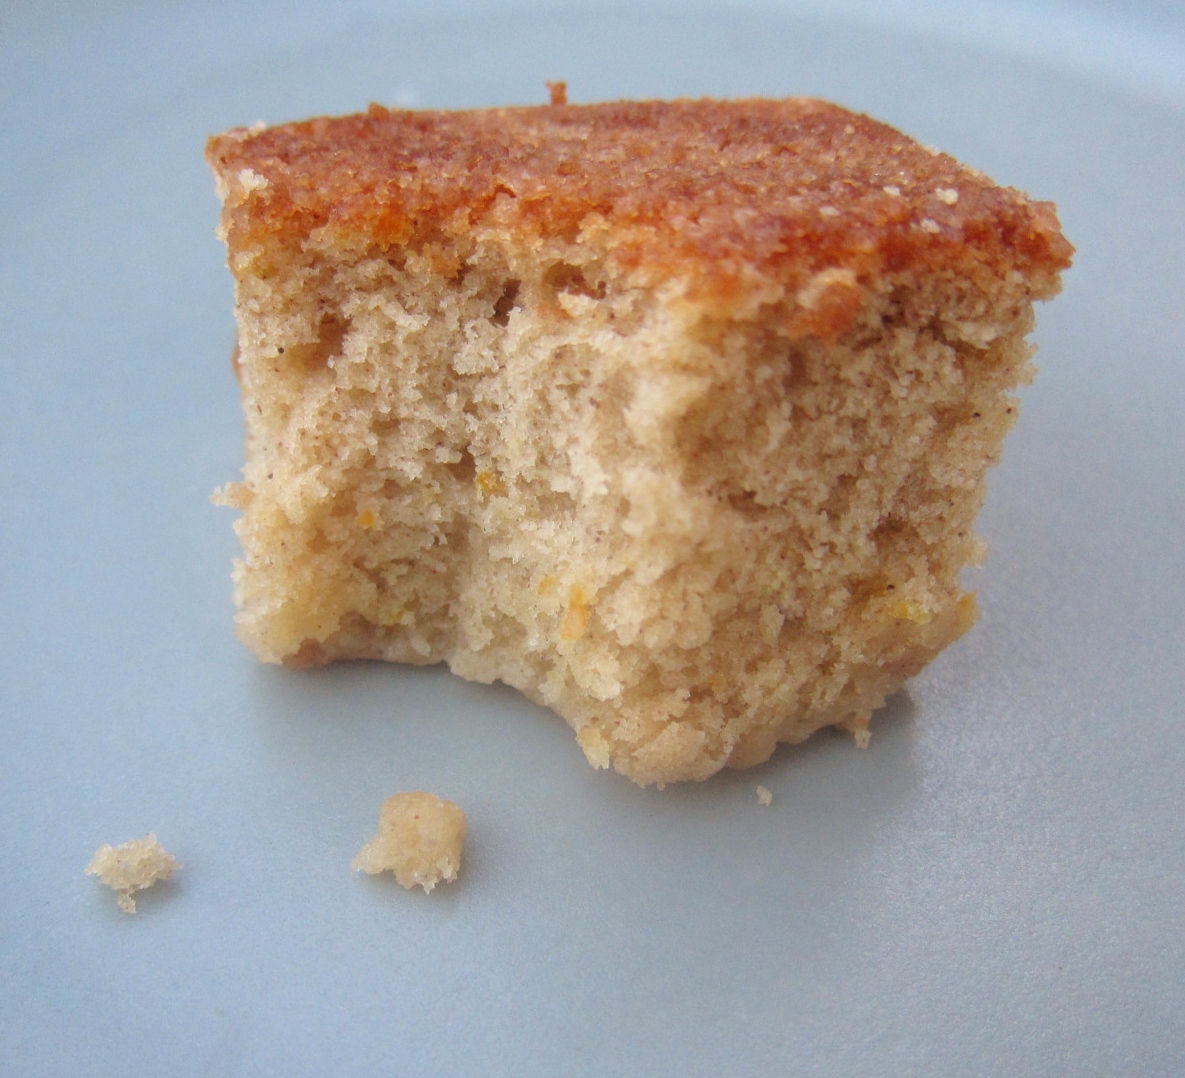
With their crisp, buttery, cornmeal-flecked shells, these petite pies offer a refreshing dessert format for the beloved herb within.  The tender golden raisins and lively bits of cilantro prove to make a deliciously balanced pair — all enhanced with tart lemon in both the filling and the crust. Sweet, gooey honey adds a welcome warmth to this otherwise tangy treat, just as the complexity of textures provides a pleasant, toothsome–and even addictive–eating experience that’s scrumptious but not too sweet.

Cilantro Sultana Mini Pies (77)

Maybe next time… Lime is well known to match nicely with cilantro, and it would make a great substitute for the lemon in this recipe.  The same is true with orange, which would also bestow a little more sweetness to these tangy treats.  To offer a subtle echo of cilantro in the crust, try adding 1/4 teaspoon of its ground seed — coriander — to the dough.  If you want to keep this dessert refined-sugar-free, skip the powdered sugar all together (they’re just as delicious unadorned), or consider whipping up some honey-sweetened cream or icing to drizzle over the pie tops.

Cilantro Sultana Mini Pies (52)Cilantro Sultana Mini Pies (128)

Posted in Baking with Herbs, Cookies & Bars, Pies, Tarts, Tortes & Cheesecakes, Sweets | Tagged , , , , , , , , , , , , , , , , , , , , , , , | 14 Comments

Brown Sugar Soy Sauce Cake: Sweet Citrus and Spontaneous Butterscotch

Brown Sugar Soy Sauce Cake (175)

Inspiration for my next dessert recipe usually comes unexpectedly.  This time, I was just poking around at one of my favorite markets and came across a beautiful little bottle of soy sauce.  The decorated label magnetized me with phrases like “small batch”, “non-GMO”, “limestone filtered Kentucky spring water”, “brewed and aged in bourbon barrels”.  But it was the description of the taste that made my dessert goggles sparkle around my eyes like magic: “hints of oak and a mild sweetness reminiscent of fine Kentucky bourbon.”  With my whiskey cupcakes fresh in my mind, I knew this soy sauce was destined to become my next dessert.  Before I knew it, I was headed home excitedly with the little bottle in hand.

Brown Sugar Soy Sauce Cake (155)My first taste of the soy sauce revealed a high quality, robust flavor that was pleasantly rich, salty, and a bit malty at once.  I couldn’t think of a better match than molassesy dark brown sugar, and my first version of this cake was based solely on this complementary pair.  But I craved more complexity and slightly different ingredient ratios, resulting in this delicious final edition (which happens to be in my oven once again as I type this).  Cooked in a skillet and embellished and enhanced with tangy oranges, the cake’s interplay of brown sugar, butter, and salt spontaneously create succulent butterscotch that’s present in every moist bite.  Here is the recipe.

Brown Sugar Soy Sauce Cake [makes a 10″ skillet cake (see note below); serves 10-12]

  • 1 – 2 small/medium oranges, Brown Sugar Soy Sauce Cake (130)preferably seedless, such as navel
  • 1/4 cup plus 1/3 cup unsalted butter*, divided
  • 2 teaspoons plus 3 tablespoons high quality soy sauce, divided
  • 1/2 cup plus 1.25 cup firmly packed dark brown sugar*, divided
  • 2 large/extra-large eggs
  • seeds scraped from two medium/large vanilla beans, or 1/2 teaspoon vanilla bean paste
  • 1 tablespoon pure vanilla extract
  • 1.5 cups flour
  • 1.25 teaspoons baking soda
  • 1/2 teaspoon baking powder
  • 1/4 cup cold water
  • 1/2 cup milk

Preheat oven to 350 F.  Rinse, dry, and finely zest the peel of one orange; set zest aside.  Slice orange horizontally in 1/4 to 1/3″ thick rings.  Look over the slices for any wayward seeds, picking them out with a paring knife as needed.  (If orange slices don’t fit in pan as whole circles, feel free to cut edges as needed.  If one orange is not enough to cover the bottom of the pan with slices, you may need to repeat the zesting and slicing process with a second orange, but please only use the amount of zest in the batter from the first one.)

Brown Sugar Soy Sauce Cake (100)In a 10″ ovenproof skillet, melt 1/4 cup butter with 1/2 cup brown sugar, whisking over low/medium heat.  When butter has melted and sugar starts looking less grainy, let bubble while whisking for another 30 seconds or so.  Remove from heat, whisk in 2 teaspoons soy sauce, and stir until even. Gently lay the orange slices in one layer on the butter mixture, prettiest sides down. Set pan aside.

In a separate container, melt the remaining 1/3 cup butter; set aside.  In a large bowl, beat the remaining 1.25 cup Brown Sugar Soy Sauce Cake (123)brown sugar with the eggs.  Beat in the melted butter until smooth, gradually adding both vanillas.  Sift the flour, baking soda and powder over the egg mixture.  Begin to mix (batter will seem dry), gradually adding the milk, water and 3 tablespoons soy sauce as you go. Scrape bowl often with spatula as you mix well. Fold in orange zest until evenly dispersed. Gently pour batter onto the orange slices in skillet.

Brown Sugar Soy Sauce Cake (139)Place pan in center of oven and bake for about 35 minutes*, until center no longer jiggles when shaken and a wooden skewer or toothpick inserted in the middle comes out batter-free (a few moist crumbs are fine).  Carefully remove cake from oven (handle will be hot). Let cool in pan for 30 minutes to an hour, until pan is still quite warm but cool enough to handle.  Loosen sides of cake with a butter knife and gently invert cake onto a large plate. Serve warm, cutting into pieces with a sharp knife straight through the orange slices.

For premium texture, this cake is best eaten soon after baking; but if you must wait longer than noted above, leave it in the skillet until ready to serve (up to overnight).  After it’s completely cooled, cover loosely with foil.  When ready to serve, remove foil, place skillet over low-medium heat for about a minute to help loosen the oranges, then loosen sides with a butter knife and invert. For gooey deliciousness, heat slices up.

Brown Sugar Soy Sauce Cake (165)With its crisp caramelized bottom and its gooey, buttery top, this citrusy cake is as beautiful as it is delicious.  The splash of robust soy sauce imbues the cake with a perfect amount of salt, balancing beautifully with the brown sugar and creating a layer of tender, butterscotchy topping that caramelizes and permeates the orange slices.  Hints of the soy sauce’s dark, brewed flavor are present in every bite, but without being overpowering or obvious about their origin. What’s more: the cake is a cinch to make, with a one-bowl batter and a simple flip-and-serve method (the decorations are built-in).

Brown Sugar Soy Sauce Cake (5)Maybe next time…  The soy sauce I used had a deep, robust flavor.  If you use a low-sodium or more diluted-tasting soy sauce, you might add another teaspoon to the buttery topping and/or replace a teaspoon or two of the water with more soy sauce in the batter.  The orange slices could be replaced with thin slices of another fruit, such as pears, peaches or apples (but please keep the orange zest in the batter — it’s wondrous!).  As with many desserts, this one is heavenly alongside a scoop of vanilla ice cream — what isn’t?

Brown Sugar Soy Sauce Cake (145)

*Some notes on ingredients and equipment:

  • Be sure to use unsalted butter in this recipe.  The soy sauce provides plenty of salt.
  • I  realize the volume of sugar here seems like a lot, but this amount offers a delectable balance to the subtle salt and malt flavor of the soy sauce.  In the different versions of this recipe I tested, this amount proved best.
  • Every pan is a little different: darker pans can bake hotter and faster; shallow pans may not fit all the batter; measurements are often subjective (my pan is 2″ deep; it’s marked as 10″ pan, but it’s only 9.75″ across the top at the widest part).  I recommend beginning to check the cake for done-ness at 25-30 minutes, and placing a layer of foil on the oven rack below it in case of spillover (but stop filling it if the batter gets too close to the rim as you pour it in).  Be sure to use an ovenproof pan; seasoned cast iron is my favorite, but almost any all-metal kind should work.

Brown Sugar Soy Sauce Cake (89)Brown Sugar Soy Sauce Cake (168)Brown Sugar Soy Sauce Cake (32)Brown Sugar Soy Sauce Cake (162)Brown Sugar Soy Sauce Cake (14)

Posted in Cakes & Cupcakes, Sweets, Traditional with a Twist | Tagged , , , , , , , , , | 15 Comments

Grapefruit Coconut Cookies: Little, Luscious, and Vegan

Grapefruit Coconut Cookies (3)I love grapefruit, especially in the winter.  Its unique flavor and tangy, juicy qualities are refreshing like no others.  I’d been itching to make a new dessert with it recently — and since I usually have numerous baking daydreams going simultaneously, it was no surprise that my citrus craving merged with another yummy yearning: shortbread.  So indulgent yet so simple, flour, sugar and a whole lot of butter are baked into cookie bliss. But this time, I wanted to make shortbread with coconut oil instead of butter; I had a fresh jar of it ready, and a dairy-free friend of mine was back in town.

Grapefruit Coconut Cookies (5)

Alongside the grapefruit zest, adding some toasted coconut seemed like a perfect match — one that would offer a soft balance to the tartness while echoing the oil’s essence. Still, I was skeptical about how the oil would behave in a dough that normally depends on butter to hold it together. Far more than butter, coconut oil liquefies almost instantly when heated, just as is solidifies quickly when chilled. I’ve enjoyed baking with it many times, but mostly in cakes that also contain eggs and other liquids to bind the ingredients. As for shortbread, I pictured little puddles of dough once it hit the oven.  But then I pondered a simple solution: could water (missing from oil but present in butter) help do the trick?  Well, it worked: a bit of boiling water made for successful (and utterly scrumptious) cookies that held their shape well. And without any eggs or butter, they were vegan, too.

Grapefruit Coconut Cookies [about 2 dozen little cookies (1 and 1/3″ diameter each)]Grapefruit Coconut Cookies (9)

  • 1/3 cup shredded unsweetened coconut
  • 1/4 cup sugar
  • 1/3 cup melted coconut oil
  • 3 tablespoons scalding hot water
  • 1 teaspoon pure vanilla extract
  • 1 and 1/3 cup flour
  • 1/2 teaspoon salt
  • 1 medium to large grapefruit (about 10-12 ounces)
  • 2/3 cup firmly packed powdered sugar** (for glaze)

Preheat oven to 325 F.  Line a baking sheet with parchment paper.  Spread coconut in a thin, even layer on lined baking sheet.  Bake coconut for about 3 – 5 minutes, until fragrant and edges are becoming golden brown. Remove from oven and set aside.  Increase oven heat to 350 F.  Rinse, dry, and finely zest the peel of the grapefruit. You should have about a heaping tablespoon of zest, loosely packed. Set zest aside; keep the zested grapefruit nearby for the glaze (see below).

Grapefruit Coconut Cookies (11)In a large bowl, whisk together the oil and sugar until even. Sift the flour and salt over the sugar mixture, and stir until a crumbly dough forms. Add the scalding hot water and the vanilla. Mix for a few minutes, until liquid is incorporated into dough. Add the zest and 1/4 cup of the coconut (set aside the remainder of the 1/3 cup).  Knead dough with hands until ingredients are equally dispersed and dough sticks together.

Make little cookie spheres using two teaspoons dough a piece; they should each weigh 0.5 ounce or 15 grams.  Place them on the parchment lined cookie sheet, firmly pressing tops down with the back of a spoon as you go along. To prevent the edges from cracking, brace sides of cookie with thumb and index finger while pressing with the other hand. This will create little round cookies about 1/3″ tall, with a roughly 1 and 1/3 inch diameter.  Bake at 350 for about 15-17 minutes, until bottoms of cookies are toasty brown. Let cool on baking sheets, then transfer to wire racks. Cookies will come to their desired crisp consistency as they cool.

Grapefruit Coconut Cookies (12)

Once cookies are no longer warm, make the glaze: Juice the grapefruit (half of it will likely yield enough juice). Strain juice and measure out 1 tablespoon plus 2 teaspoons.  Into a medium bowl, sift the powdered sugar.  Whisk the juice in gradually, stirring well between additions: 1 tablespoon, then 1 teaspoon, then the second teaspoon if glaze doesn’t seem too thin already.  It should be pourable but not water-like or clear.  Whisk until smooth and even.

Grapefruit Coconut Cookies (10)

Place the racks of cooled cookies over wax paper, parchment, or a large washable plate or board.  Make sure cookies are spaced at least 1/4 inch apart from one another. Drizzle each cookie with about 1/2 teaspoon icing, pouring the spoonful directly over each cookie and letting it run off edges.  If needed, scrape up the glaze from under the cookie rack and reuse.  While glaze is still wet, sprinkle each cookie with a tiny pinch of the remaining toasted coconut.  Let glaze dry completely before eating.

Grapefruit Coconut Cookies (1)Crisp, rich and citrusy, these creamy coconut cookies are perhaps even tastier than traditional shortbread—even without the butter. Their satisfying crunch is perfectly delivered a beautiful, bite-sized format.  The hint of tangy grapefruit and the soft, toasty coconut prove to perform a well-balanced and delicious duet to every last crumb. They’ve been happily devoured by both vegans and butter-addicts, coconut lovers and citrus fanatics, sweet-toothed and savory snackers.  I hope you enjoy them, too.

Grapefruit Coconut Cookies (6)** Maybe next time…If keeping these cookies vegan is important to you, look for vegan powdered sugar for the glaze (much conventional powdered sugar is apparently exposed to animal products when processed).  If another citrus fruit is calling to you over grapefruit, feel free to use lemon, lime or orange in its place — any of these would be fantastic and would complement the coconut wonderfully.  This cookie dough is a little bit lumpy by nature, but it holds its shape well; so if you don’t mind slightly bumpy tops, you could roll and cut these cookies into shapes if you wish.  These cookies are truly tiny at only two teaspoons of dough each; if you want to make them larger, feel free — but remember that the recipe will yield fewer cookies and they’ll need to be baked longer.

Grapefruit Coconut Cookies (2)

Posted in Cookies & Bars, Sweets, Traditional with a Twist, Vegan | Tagged , , , , , , , , , , , , , | 11 Comments

Blueberry Basil Bourbon Cupcakes

blueberry-bourbon-basil-cupcakes-23Blueberries, bourbon, basil.  It might sound like a tongue-twister, or an odd amalgamation at best.  But please trust me: this trio of flavors is a sweet symphony of complementary bliss.  While I’ve made plenty of desserts with liquor and occasionally with basil, I can’t take any credit for this magical combination.  It was fully inspired by the glaze on a gourmet donut that my honey and I shared on a recent day off together.  After tasting it, I couldn’t shake the vibrancy of its fruity, grassy warmth from my mind.  I found myself daydreaming of basil and blueberry jam-filled treats, fragrant with bourbon and maybe even some cream cheese.  Soon after, these admittedly over-the-top cupcakes were born.

Blueberry Bourbon Basil Cupcakes (24)

I haven’t yet delved into the world of homemade jam-making, so I chose one as natural and flavorful as I could’ve hoped, with only berries, apple juice and pectin on the list of ingredients.  Snippets of fresh basil proved to bloom with herbal deliciousness once whisked into the jam.  A tender but sturdy cake batter would be the perfect vessel — one with a dose of bourbon big enough to offer a fragrant kick. And finally, a modest swirl of tangy frosting would keep over-sweetness at bay, while echoing the tart essence of the other cupcake components.  Here is the scrumptious success.

Blueberry Basil Bourbon Cupcakes (makes 12)

FOR THE JAM FILLING:Blueberry Bourbon Basil Cupcakes (4)

  • ¼ ounce (7 grams) fresh basil leaves (plus 12 tiny leaves or leaf tips for topping the cupcakes; see below)
  • 2/3 cup blueberry jam, preferably not too sweet (plus 1-2 teaspoons for the frosting; see below)

Up to 48 hours before serving the cupcakes, rinse and dry basil leaves. Discard stems, then finely mince the leaves. You should have about a heaping tablespoon of minced basil, loosely packed.  Whisk it into the jam until evenly distributed. Cover and chill.  The longer the jam sits, the more basil-infused it will be.

FOR THE CREAM CHEESE FROSTING: Blueberry Bourbon Basil Cupcakes (12)

  • 8 ounces cream cheese at room temperature
  • ¼ cup (2 ounces) softened butter
  • ¼ cup plus 2 tablespoons powdered sugar
  • dash of salt
  • 1-2 teaspoons blueberry jam

Up to 48 hours before serving the cupcakes, beat the cream cheese and butter until well blended and even in consistency, preferably using the whisk attachment of an electric mixer. Stop and sift the sugar and salt over the mixture, and keep beating until fluffy, scraping down sides of bowl often. Fold in the jam. Cover and chill. Within an hour of assembling the cupcakes, bring the frosting back to cool room temperature, re-beating if needed, and transfer to a pastry bag.

FOR THE CUPCAKES:Blueberry Bourbon Basil Cupcakes (5)

  • ¼ pound fresh blueberries
  • ½ cup butter at soft room temperature
  • ½ cup granulated sugar
  • 2 teaspoons pure vanilla extract
  • 2 medium/large eggs
  • 1/3 cup plain low fat yogurt (preferably not Greek or strained)
  • 1.5 cups all-purpose flour
  • 1 teaspoon baking powder
  • ½ teaspoon baking soda
  • ½ teaspoon salt
  • ½ cup strong, flavorful bourbon

On the day of serving the cupcakes, line a muffin pan with 12 paper liners. Preheat oven to 350 F. Rinse and dry the blueberries. Set aside 12 of the prettiest ones for topping the cupcakes, then slice the remaining berries in half. Set aside. In a large bowl, beat the butter and sugar until smooth and fluffy. Beat in the vanilla followed by the eggs one at a time.  When the mixture is even in color, beat in the yogurt (don’t be alarmed if the batter looks curdled briefly).

Blueberry Bourbon Basil Cupcakes (8)

Sift the flour, baking powder, baking soda, and salt over the mixture.  Stir until even; batter will seem thick. Mix in the bourbon until texture is smooth, scraping sides and bottom of bowl with spatula often.  Finally, fold in the sliced blueberries.  Scoop batter into lined muffin pan, filling each cup about 2/3 full.  Bake cupcakes for 15-18 minutes. Centers will be domed and crackly, and the air will emit warm bourbon bliss.

Blueberry Bourbon Basil Cupcakes (10)Remove cupcakes from muffin pan as soon as cool enough to handle, transferring them to a cutting board or counter top. Just when they reach room temperature or a little warmer, cut a generous but not too deep cone out of the core of each. It helps to insert a sharp paring knife with one hand, while turning the cupcake with the other. Fill each indention with a spoonful of jam.

Pipe a not-too-tall spiral of frosting over the top of each cupcake, starting at the outside edge and ending in the center.  Top each cupcake with a small basil leaf or leaf tip, then a whole blueberry.  Serve the same day, at room temperature.  If you must refrigerate, let the cupcakes come to room temperature, sitting out for 45 minutes before eating.

Blueberry Bourbon Basil Cupcakes (26)

Creamy with a kick, the berry-flecked batter of these cupcakes offers a warmth that’s balanced perfectly with a whisper of sweet basil.  Surprisingly not too sweet, every bite is somehow both refreshing and relaxing, imparting a softness of flavors that entertains your palate while you sit back and savor it.  Tangy, juicy and boozy, these herbal indulgences are satisfying to the last crumb.  And if the name feels like too much to say, give your voice a rest, and instead fill your mouth with the very embodiment of the all those syllables.

Blueberry Bourbon Basil Cupcakes (3)Maybe next time… Almost any fresh berries or any liquor could be successfully substituted in this recipe — but I stand by my declaration that blueberries, bourbon and basil belong together.  (A friend of mine said something like, “Basil always gets coupled with strawberry, but now that I’ve tasted these, I think blueberries are better with it!”)  I’m not a big whiskey-drinker, but I really loved the flavor and strength of this bourbon in this recipe; it really held its character, unlike many liquors that seem to evaporate when baked — but choose any kind you like.  If you don’t want to use alcohol at all, substitute a thin, not too sweet juice such as blueberry or lemon.  Finally, if you’re like me and don’t make homemade jam (yet), there are some great reviews and recommendations here.

Blueberry Bourbon Basil Cupcakes (17)Blueberry Bourbon Basil CupcakesBlueberry Bourbon Basil Cupcakes (15)Blueberry Bourbon Basil Cupcakes (20)Blueberry Bourbon Basil Cupcakes (22)

Posted in Baking with Herbs, Baking with Spirits, Cakes & Cupcakes, Sweets | Tagged , , , , , , , , , , , , , | 13 Comments

Buttered Rum Cake: Crispy, Gooey, Buttery and Boozy

buttered rum cake (37)

When my husband and I took a little getaway recently, we left without any set plans except to explore.  The trip worked out wonderfully; we found ourselves refreshed by easy discoveries of countless charming shops, festive neighborhoods, and beautiful bridges and buildings. One evening, we happened upon a colorful and inviting corner restaurant aptly named El Cubo de Cuba.  Its friendly, casual atmosphere offered a warm welcome on a frigid winter night.  We happily ordered plantain-laden plates of rich yellow rice, spiced beans, stewed veggies and simmered meats.  And we noticed a little sign at the counter: “Heat up with a hot buttered rum!”  I ordered one, impulsively.

buttered rum cake (34)When the drink was served, I found myself nestling a steaming mug with a beautiful orange slice floating at its surface. Its scent was rich with melted butter and a bit of scrumptious spice. My senses were enraptured as I was brought to that magical moment when you know your dessert is almost done baking: the kitchen is toasty and the air is so fragrant you wish you could eat it instead of inhale.  I knew right then that a buttered rum dessert was to be my next creation.  It would have to be relaxed, warming and delicious — just like the place that inspired it.  A soft sheet cake proved to be the perfect format: one with a moist crumb and a balance of toothsome textures in every flavorful bite.

Buttered Rum Cake [makes a 9 x 13″ pan, about 24 servings]

For the cake:buttered rum cake (25)

  • 1/4 cup turbinado sugar
  • 1 cup softened unsalted butter, plus more for pan + rum soak
  • 2/3 cup granulated sugar, plus more for the rum soak
  • 2/3 cup brown sugar
  • 4 eggs
  • 1 tablespoon pure vanilla extract
  • 3 cups all purpose flour
  • 1 teaspoon baking powder
  • 3/4 teaspoon baking soda
  • 1 teaspoon salt
  • 1 teaspoon ground cinnamon
  • 1 cup buttermilk
  • 2 tablespoons dark or spiced rum, plus more for the rum soak
  • finely grated zest of one orange

Place one oven rack on the lowest rung, and one at the center or a little higher. (The partial baking time on the lower rung will help create a crisp sugar layer.) Preheat oven to 325 F. Grease the sides and bottom of a 9 x 13″ pan, then line the bottom with parchment, and grease the top of the parchment. Sprinkle the buttered parchment evenly with the turbinado sugar, being sure to get it all the way to the edges. Set pan aside.

In a large bowl, beat the cup of butter and the sugars until pale and fluffy.  Keep beating as you add the eggs one at a time.  Beat in the vanilla.  Over the butter mixture, sift: flour, baking powder and soda, salt, and cinnamon.  Begin to mix, gradually adding buttermilk and rum as you stir, stopping and scraping down sides of bowl with spatula very often.  Just when batter is smooth and even, fold in the zest until evenly distributed.

Gently spread batter into sugared pan, without pulling upward (you don’t want to move the turbinado sugar much). Set filled pan on the low rack in oven and bake for 20 minutes, then quickly and carefully move cake to upper rung (at center or a little higher); bake for about 12-15 minutes. Check cake’s center with a toothpick; when cake is done, toothpick will come out free of wet batter (a few moist crumbs are OK). Cake will be golden, domed and fragrant. Remove from oven; immediately make the buttered rum soak.

buttered rum cake (32)For the buttered rum soak:

  • 1/3 cup granulated sugar
  • 1/3 cup butter
  • 1/3 cup dark or spiced rum
  • dash of salt if butter is unsalted

In a small saucepan, heat all ingredients over low/medium heat, stirring occasionally and heating just until the sugar dissolves and butter is melted.  Do not boil or overheat.  Use a skewer to poke numerous holes evenly all over the warm cake, being sure to go to edges.  Use a pastry brush to generously paint the rum soak all over the cake.  It might seem like too much sauce, but after three or four rounds of brushing and occasionally re-poking with the skewer, the sauce will be all used up and the cake will not get soggy.  Let cake cool in pan at room temperature until no longer warm to the touch.  When ready to serve, invert the cake onto a platter, cookie sheet, or large cutting board.  Slice, serving in paper cupcake liners if desired.  Store cake covered at room temperature; do not chill.

buttered rum cake (20)

Crispy on the top and delightfully gooey on the bottom, buttered rum cake offers not only an incredible symphony of textures, but also a whisper of citrus and cinnamon spice. Its warm rum presence imparts a soft undertone of spirits that’s both calming and captivating, with just enough rum that some tasters won’t quite distinguish it, while others will relish in recognizing it.  One part rich adult indulgence, one part casual coffee-cake-like treat, buttered rum cake is the best of many worlds in one.  For me, it’s a delicious nod to the lovely and laid-back evening that inspired it.

buttered rum cake (1)

*Maybe next time… For this recipe (especially for the rum soak) I like to use good quality butter, if possible, salted and grass fed — though any kind will do. For a decadent and utterly delicious treat, warm the slices for a few seconds just before serving (highly recommended!).  If you used a metal pan (not glass or ceramic), you can create a crispier, more caramelized sugar top if you’d like: place the baked cake (just rum soaked, still warm and in the pan) on top of a low-heated griddle for 5-10 minutes.  This cake goes with almost anything: fresh berries, a scoop of ice cream, hot coffee, or even a cocktail.  Be warmed by the casual spirit of every bite!

buttered rum cake (16)buttered rum cake (14)buttered rum cake (5)

Posted in Baking with Spirits, Cakes & Cupcakes, Sweets | Tagged , , , , , , , , , | 13 Comments