Sweet Pea Spring Cake

Sweet Pea Spring Cake (6)Frozen peas are my backup for fresh veggies, and the kind I buy come in a bag that boasts: “Naturally sweet!”  Those pretty italic words have been calling to me lately.  Of course, I usually mask the peas’ sweetness with a bit of sea salt or parmesan and eat them as a savory side.  But then again, I’ve done the same thing with carrots, zucchini and pumpkin;  and if these can make popular desserts — cakes, sweet breads, pies — why not give peas a chance?  So last weekend I finally paired my sweet peas with sugar, flour and vanilla (along with fresh peppermint leaves and a bit of tangy lemon zest).  The result was a delicious and utterly un-pea-like cake, bursting with citrus and sweet herbal undertones.  Here is the recipe.

Sweet Pea Spring Cake (1)Sweet Pea Spring Cake (makes two 8” layers)

  • 4 small lemons
  • 1 ¾ cup green peas (about 9.5 ounces), defrosted if using frozen peas, drained if needed
  • ¼ cup (about .25 ounce or 5 grams) fresh peppermint leaves, moderately packed, rinsed and dried, stems removedSweet Pea Spring Cake (15)
  • 5 egg whites
  • 1 cup sugar, divided
  • 1 tablespoon pure vanilla extract
  • ¼ teaspoon mint extract (optional)*
  • ¾ cup melted coconut oil*
  • 1 ½ cup flour
  • ½ teaspoon salt
  • 1 teaspoon baking powder
  • 3/4 teaspoon baking soda
  • scraped seeds from one medium vanilla bean or 1/2 teaspoon vanilla bean paste

Preheat oven to 350 F.  Lightly grease insides and bottoms of two 8″ cake pans, and line bottoms of pans with parchment; set aside. Finely zest the peel of one lemon; set zest aside. Juice the peeled lemon, plus 2-3 more, to make 3/4 cup lemon juice (seeds removed); set aside.  Fill food processor with peas and peppermint leaves.  Blend, gradually adding 1/2 cup of the lemon juice (reserve remaining 1/4 cup juice).  Stop occasionally to scrape down sides, and keep blending for just a few minutes, until mixture is consistent and there are no remaining big leaf pieces or whole peas.  Texture should be even but rather thick and not smooth.

Sweet Pea Spring Cake (14)With an electric mixer, beat egg whites on high speed, gradually adding ¼ cup of the sugar once whites are foamy and becoming white.  Keep beating until whites are fluffy, opaque, and hold quite solid peaks; set aside.  In a large bowl, beat the remaining ¾ cup sugar, oil and extracts until smooth.  Gently fold in the pea mixture, stirring until even.  Sift or sieve over the mixture: flour, salt, baking powder and soda.  Mix until incorporated, adding remaining ¼ cup lemon juice along the way.  Fold in the vanilla bean seeds and lemon zest until just evenly dispersed.  Gently fold in the egg whites 1/3 at a time until just incorporated, being careful not to flatten them too much.  Batter will be frothy and delicate.  Quickly transfer it equally into the prepared pans, spreading gently to edges.  Bake for 25-35 minutes or until toothpick tests clean in center and edges are becoming golden brown. Cakes will be an unusual color and not very tall.  Let them cool completely in pans before loosening edges with knife and removing. Once cool, cover until ready to frost or decorate, then store and serve at room temperature; do not refrigerate.

Sweet Pea Spring Cake (13)
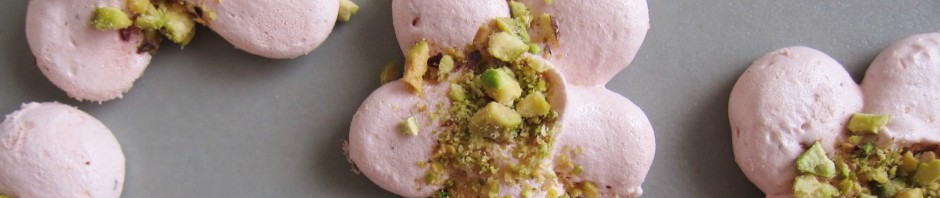
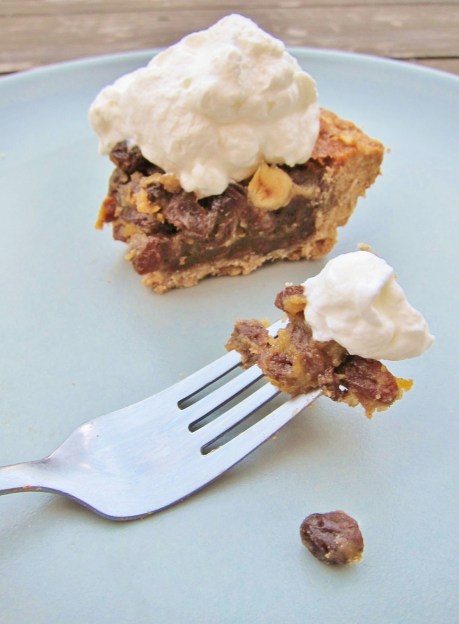
Because the cake is best at room temperature, you’ll want to wait to frost it until just ready to serve.  This refreshing cake matches perfectly with a basic cream cheese icing.  To keep the dessert dairy-free, I opted to frost mine with this meringue frosting, replacing the orange juice/champagne mixture with: 4 tablespoons lemon juice, 3.75 teaspoons vanilla, and (optional) scant 1/4 teaspoon mint extract.  If desired, add a drop of green food coloring to your icing and/or decorate with peppermint leaves and even peas — that is, if you’re confident they won’t scare away your diners.

Sweet Pea Spring Cake (4)
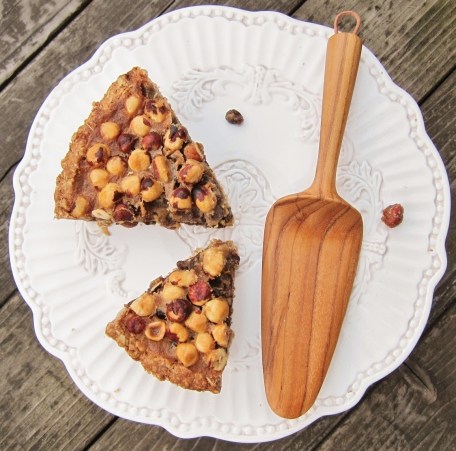
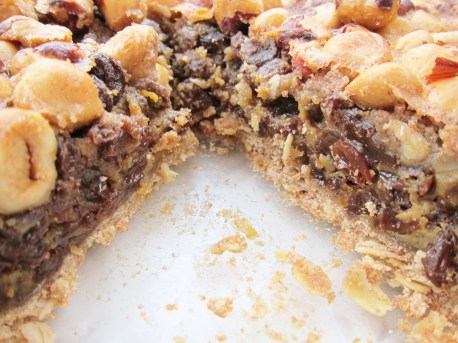
Extraordinarily spring-like and scrumptious, this sweet pea cake is a truly luscious dessert. Rather unsurprisingly, its texture reminds one of moist carrot cake with pineapple in the batter, while its flavor offers grassy hints that perfectly highlight the citrus and mint within.  With an open mind and an open mouth, let us all welcome peas to the wonderful world of veggie-laden desserts.  After all, they’re in very good company.

Sweet Pea Spring Cake (8)*Maybe next time…If you want to skip the frosting, a dusting of powdered sugar would make a winning topping. Similarly, I imagine orange zest would be a great addition or replacement for the lemon.  I chose coconut oil because of its natural sweetness and pleasant flavor, but if you don’t have any, melted butter will work fine. Also, I chose mint extract (which is a mixture spearmint and peppermint) over the more potent pure peppermint extract.  Peppermint extract is known as a finer product because of its purity and strength, but sometimes I prefer the more generic mixed mint type because of its softer flavor.  If you use peppermint extract, use caution and add it very slowly.  Finally, organic peas tend to be sweeter than conventional peas and often don’t cost much more.

Sweet Pea Spring Cake (2)Sweet Pea Spring Cake (10)Sweet Pea Spring Cake (5)Sweet Pea Spring Cake (12)

Posted in Baking with Herbs, Baking with Veggies, Cakes & Cupcakes, Sweets | Tagged , , , , , , , , , , , , , , , , , , | 28 Comments

Oatmeal Raisin Hazelnut Pie: Fabulous and Filling

Oatmeal raisin pie When I first decided to make an oatmeal-cookie-like pie crust, I couldn’t imagine a finer filling than creamy, plump raisins.  What a better way to emulate the classic cookie that’d inspired me?  But something was missing.  For one, I didn’t want my pie to look like a black blob of raisins from the top.  Second, even though I don’t usually make my oatmeal cookies with nuts, I felt the urge to add them here.  I decided to reach for hazelnuts, trusting my well-known favorite to be delightful for the eyes and mouth alike.  All together, the oatmeal raisin pie proved to be hearty, fragrant and utterly scrumptious.

Oatmeal Raisin Hazelnut Pie (makes one 9” pie; serves 10-14).

For the crust:Oatmeal raisin pie

  • ½ cup butter at room temperature
  • 2-3 tablespoons brown sugar, depending on sweetness of filling
  • ¾ teaspoon salt (decrease if butter is salted)
  • 1.5 teaspoons ground cinnamon
  • ¾ cup whole wheat flour
  • 1.25 cups whole old fashioned oats
  • 1 tablespoon lemon juice

Lightly grease 9″ pie pan.  Mix butter and sugar until even in consistency.  Sift salt, cinnamon and flour over butter mixture; stir, adding lemon juice to aid moisture.  Fold in the oats and mix with bare hands until dough sticks together and texture is even.  Firmly push into pan, using knuckles to pack dough evenly in bottom and sides (about 1/4 to 1/3” thick); if pan is glass, hold crust up to light to look for thin spots.  Freeze crust for 45 minutes or up to overnight.

Oatmeal raisin pieFor the filling:   

  • 2 cups raisins, well packed
  • 1.25 cups boiling water
  • 1/3 cup melted butter
  • 1/3 cup brown sugar
  • 2 teaspoons vanilla
  • 3 eggs (room temperature)
  • 1/3 cup whipping cream
  • 1 tablespoon corn starch
  • 2 teaspoons orange zest
  • 1.25 cup roasted hazelnuts, most skins removed

Preheat oven to 375 F.  Bake the frozen pie crust for 6-8 minutes, then remove from oven to let cool a bit.  Pour the boiling water over the raisins in a heatproof bowl.  Let sit in water 5-10 minutes; drain in sieve.  While raisins are draining, beat the butter, sugar, vanilla, eggs, and whipping cream.  Sift cornstarch over the mixture, and keep beating until batter is bubbly and light in color; set aside.  Shake any excess water out of the raisins, then toss the orange zest in with them.  Pour raisins and zest into the pie crust.  Top with an even layer of nuts.  Slowly pour batter over pie, filling to inner edge of crust but not overflowing (you may have a few extra tablespoons batter) and rearrange nuts if needed.  Bake 30 minutes.  Pie will be amazingly fragrant and toasty at this point.  Cover it loosely with a piece of aluminum foil and return to oven for another 10 minutes. Remove from oven; let cool for at least 3 hours or overnight.  Store and serve at room temperature, topping each small slice with lightly sweetened whipped cream before devouring.

Oatmeal raisin pieFabulously filling and rich, oatmeal hazelnut raisin pie is satisfying on many levels.  Its chewy raisin center matches perfectly with its crumbly whole wheat crust, just as its hint of cinnamon complements the spontaneous butterscotch in the filling.  Nutty and nourishing, this pie is as perfect for dessert as it can be for breakfast. With fruit, oats and eggs on your fork, who will argue with its wholesomeness? (No need to mention the brown sugar, butter or cream…)

Oatmeal raisin pieMaybe next time…  If you’re not a fruit-and-nuts kind of person, please consider making the unusual oatmeal crust, which is independently delicious and versatile (I’m already working on a cinnamon caramel custard pie in it—stay tuned!).  If you want to stick with dried fruit, I’m sure that dried apples, pears or cranberries would make winning additions.  If hazelnuts aren’t your favorite, try walnuts, pecans or macadamias in their place.  I love adding orange zest to many dessert recipes, but if you want to omit it here or use lemon instead, feel free.  Finally, for a punch of spice, you might try tossing in a tablespoon of finely minced crystallized ginger with the raisins.  Whatever you do, enjoy!

Oatmeal raisin pie Oatmeal raisin pieOatmeal raisin pieOatmeal raisin pieOatmeal raisin pie

Posted in Pies, Tarts, Tortes & Cheesecakes, Sweets, Traditional with a Twist | Tagged , , , , , , , , , | 20 Comments

Little Coconut Cakes

Little Coconut Cakes (12)I’ve been rather intrigued with the array of coconut products at the market lately.  Coconut water, coconut creamer — even coconut vinegar, and more.  When I was recently given both a fresh jar of coconut oil and a bag of curious coconut sugar (it looked like rocky brown sugar), I felt compelled to combine them and create a new treat.  I decided to add coconut milk, coconut flour and shredded coconut: a quintuple coconut concoction!  The result was downright delicious (and arguably healthy).  Here is the recipe.

Little Coconut Cakes (makes about 4 dozen mini-muffin sized cakes)Little Coconut Cakes (4)

  • 1 ¼ cup unsweetened shredded coconut, divided
  • 1 cup drained crushed pineapple (from a 20-ounce can in juice, not syrup)
  • 1 cup coconut sugar*
  • ½ cup coconut oil, melted
  • 4 large eggs
  • 2 teaspoons pure vanilla extract
  • ½ teaspoon salt
  • 1 teaspoon baking soda
  • 1 teaspoon baking powder
  • 1 cup coconut flour*
  • 1 cup canned light coconut milk

For the glaze:

  • 1 cup powdered sugar
  • 1 egg white (2 tablespoons)
  • 2 Tbsp. pineapple juice from can above

Preheat oven to 350 F.  Using oil or nonstick cooking spray, generously grease your mini muffin pans; set aside.  On a baking sheet, toast shredded coconut for 6-8 minutes, until fragrant and becoming golden brown.  Meanwhile, place a sieve over a bowl and pour the crushed pineapple over it; let it sit to drain, gently pushing down on it once to aid draining.

Little Coconut Cakes (6)Sift the coconut sugar into a large bowl (include the little crystals in your batter; just be sure to remove all the large clumps as you sift).  Beat sugar on medium/high speed with coconut oil, adding the vanilla and then the eggs one at a time, mixing until even.  Sift the salt, baking soda, baking powder and coconut flour over the egg mixture. On low speed, blend the batter as you pour in the coconut milk, again mixing until even.  Batter will seem very dry. Add 1 well packed cup of the drained pineapple (you’ll have some crushed fruit left over to use as you wish; reserve the juice for glaze).  Fold in 1 cup of the toasted coconut until evenly distributed.  Fill your muffin tins with about 1 heaping tablespoon of batter per cup.

Bake for 20 minutes, until Little Coconut Cakes (8)fragrant and with toasty edges.  Let cakes cool in pan for 10-15 minutes, then loosen with a butter knife and remove by inverting pan or using a spoon to scoop them out. Let cakes cool completely on counter top or cooling racks. Make the glaze by vigorously whisking together the powdered sugar, egg white, and pineapple juice.  Drizzle each upside-down cake with 1-2 teaspoons glaze; quickly top each one with a pinch of the remaining toasted coconut.  If using cooling racks as you glaze, place the racks over a cookie sheet and/or parchment paper, and use a spatula to scrape up and re-use the glaze that collects below the racks.  Let the icing dry completely, then devour!  Cakes are best eaten at room temperature, not refrigerated, and stored in a loosely covered container (not airtight) for up to three days.

Little Coconut Cakes (14)
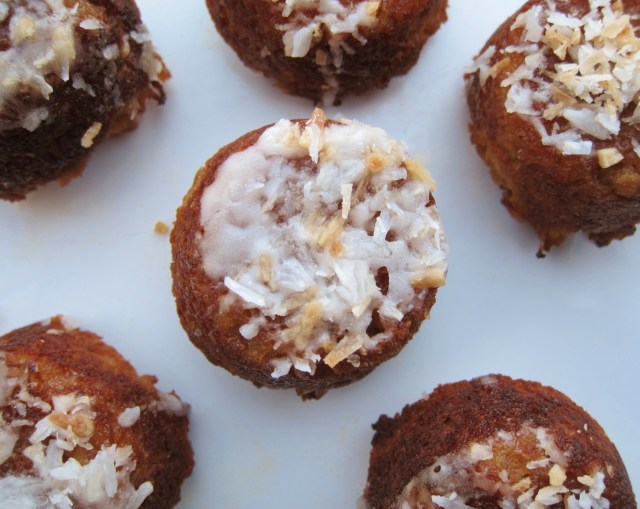
Little coconut cakes are wondrously moist and flavorful, rich with gentle sweetness in every bite.  Their tad of glaze creates a crisp shell that surrounds their soft, coconutty centers, while their bits of pineapple offer an inviting texture. Remarkably delicious, they are gluten-free, dairy-free and — aside from the glaze — contain no refined cane sugar.

Little Coconut Cakes (13)Maybe next time… To keep refined cane sugar completely out of this recipe, omit the glaze or replace it with a different topping: perhaps a coconut sugar based frosting or a dab of maple syrup to which the sprinkle of coconut will fasten.  These little upside down cakes would also make lovely mini cupcakes; bake with or without paper liners, keep upright instead of inverting, and add a pretty little spiral of icing on top of each one.  While I’ve never used coconut extract before, I imagine it would be a yummy replacement for part or all of the vanilla extract, and would be highly fitting, only bumping up the coconut flavor.

Little Coconut Cakes (5)*While I’m sure there are plenty of great brands available, I used Madhava Organic Coconut Sugar.  Made from the sap of coconut flower buds, the sugar had a sweet caramelized flavor and was surprisingly dark in color.  As for coconut flour, I used Coconut Secret, which I found to be delightfully fragrant, light and fibrous. Coconut flour is apparently made by drying and finely milling the uncooked, white meat of the coconut.

Little Coconut Cakes (11)

Posted in Cakes & Cupcakes, Sweets, Traditional with a Twist | Tagged , , , , , , , , , , , , , , | 18 Comments

Tart Mandarin Orange Cheesecake

Mandarin orange cheesecake (9)One of my favorite things about winter is as simple as this: eating a mandarin orange.  In the darkest days of the year, the little fruit comes into peak season like a timely gift.  With a burst of vibrant color and juicy sweetness, a mandarin can provide much needed refreshment, at once quenching physical thirst and a longing for brighter days.

Mandarin orange cheesecake (10)I most often choose the seedless and easy-to-peel varieties—Satsumas first, Clementines second—both of which I’ve devoured vast amounts of over time.  I’ve long wanted to celebrate their wonder by turning them into a dessert, and now I finally mustered the restraint to save enough of them for the endeavor.  Here’s what I made in their honor.

Mandarin Orange Filled Cheesecake (makes a 9” cheesecake; serves 12)

  • 3 cups crushed graham crackers, loosely packed (about 18 crackers; two sleeves)
  • ½ cup crushed pecans or almondsMandarin orange cheesecake (2)
  • ¼ teaspoon ground cloves
  • ½ cup butter, melted
  • 1.5 pounds cream cheese at very soft room temperature
  • ¾ cup powdered sugar*
  • 3 eggs
  • ¼ teaspoon pure orange oil
  • 2 teaspoons pure vanilla extract
  • 10 seedless mandarins (about 1.5 – 2 pounds)
  • See below for more ingredients if decorating the top (optional but pretty!)

Mandarin orange cheesecakePreheat oven to 350 F.  Lightly grease sides and bottom of 9” springform pan.  Peel and split the mandarins into segments, tasting a few to make sure you have a sweet batch. Discard any easy-to-pull white strands (no need to be too finicky); set oranges aside. Stir together the first four ingredients well, then push mixture into pan evenly and very firmly.  You should have enough to cover the bottom and about ¾ of the way up the sides.  Bake crust for 8-10 minutes, until fragrant and edges are just starting to brown; set aside to cool.  Separately, on low speed, beat the softened cream cheese, orange oil, and  vanilla just until smooth, adding eggs one at a time while Mandarin orange cheesecake (3)beating.  Sift the powdered sugar over the batter and mix until just even and incorporated. Spread half of the batter into the cooled crust.  Top with half of the orange segments (about 40-50), then spread remaining batter over oranges to the edges of the pan.  Bake for 50-55 minutes, until center is set.  Cheesecake will be golden brown and domed around sides; it will flatten a bit as it cools.  Let cool for at least 3 or 4 hours before removing from pan.

Mandarin orange cheesecake (19)At this point, you can serve each slice chilled or at room temperature, topped with a generous handful of the remaining orange segments. Or, if you’re like me and have the urge to decorate your cheesecake (let alone any dessert), then reach for:

  • 8 ounces cream cheese at soft room temperature
  • ½ cup powdered sugar, sifted
  • ½ teaspoon pure vanilla extract
  • ¼ teaspoon pure orange oil
  • 1 dash ground cloves
  • ½ cup apricot preserves
  • 2 tablespoons water

On high speed, beat together the first five ingredients until fluffy and well beaten. Spread onto top of cooled cheesecake, then use a pastry bag to pipe a border if desired.  In a small saucepan, heat the preserves and water until bubbling.  Reduce heat to simmer and whisk well for about 30 seconds, then turn heat off.  Let the apricot glaze cool a bit while you arrange the remaining mandarins on your cheesecake.  Whisk glaze again and use a pastry brush to coat the oranges with shiny sweetness.  If desired, use the extra apricot glaze to brush the sides of the crust, or serve your cheesecake with a drizzle to temper its tartness.

Mandarin orange cheesecake (14)Creamy, rich and satisfying, mandarin orange cheesecake is a successful salute to the fabulous fruit that inspired it.  Studded with bits of baked citrus that offer both tartness and texture, each dense slice is enveloped with nutty, flavorful crust.  The trace of cloves within offers a hint of complementary spice, while the topping of fresh, juicy oranges reminds us that mandarins are perhaps most delicious and beautiful in their purest state.

Mandarin orange cheesecake (18)*Maybe next time… Like apricots, oranges get tangier as they cook, and with the small amount of sugar in this recipe, the result here is a quite tart, not-too-sweet dessert.  If you want a sweeter cheesecake, try reducing the amount of orange segments you embed in it, and add another 1/4 cup sugar.  (I chose powdered sugar for its texture and the corn starch in it, creating a smooth, firm cheesecake — but if you add more sugar, I suggest using granulated sugar for the extra portion; this cheesecake doesn’t need the additional firmness that more corn starch would add.)  The scraped seeds of a few vanilla beans would be a delectable addition to both the crust and batter of this dessert, and if you like the idea of more than a trace of spice, another dash or two of cloves would also add some welcome flavor. Likewise, the addition of finely grated orange zest always bumps up the citrus scrumptiousness.

Mandarin orange cheesecake (13)Mandarin orange cheesecake (7)Mandarin orange cheesecake (12)

Posted in Pies, Tarts, Tortes & Cheesecakes, Sweets, Traditional with a Twist | Tagged , , , , , , , , , , , , , , , , , , , | 20 Comments

Almond Butter, Peanut Butter: Two Tiny, Tasty Cookies

Nut butter cookies (9)I know, I know: peanut butter cookies are nothing new.  But they’re my husband’s favorite, and to tell you the truth, I’ve never really been satisfied with the recipes I’ve found for them.  Everyone has their own preference — and I wanted little, dense, soft cookies that tasted really nutty.  Instead I got crisp and airy, oily and bland, dry and gritty, sugary and enormous.  I tried recipes with cake flour, no flour, cream cheese, and on.  Finally, I took out a bowl and made my own recipe, tinkering with it time and again until I felt victorious (and my honey was happier than ever).  Then I thought: what about almond butter?  I Nut butter cookies (1)knew its delightfulness but hadn’t tasted it in dessert form. Using my newly created peanut butter cookie recipe, I did a few trial runs and found that almond butter – though it acts a little different than its more common cousin — is just as easy, just as delicious… and just as loved in my house.  The recipe for both cookies is simple and easy, made in one bowl with no mixer, then a quick stint in the oven.

Almond Butter or Peanut Butter Cookies [makes 25 – 30 little (1.25-1.5”) cookies]

  • 3/4 cup peanut or almond butter (I prefer chunky nut butters that contain nothing but roasted nuts and salt, but please use whatever kind you like best)
  • 2 – 3 tablespoons softened butter*
  • 1/3 – 1/2 cup moist brown sugar, packed*
  • 1 large egg yolk
  • 1/2 teaspoon vanilla extract (for peanut butter cookies)
  • OR 1/2 teaspoon almond extract (for almond butter cookies)
  • 1/2 cup all purpose flour
  • 1/4 teaspoon salt (increase to 1/2 teaspoon if your nut butter is unsalted)
  • 1/4 teaspoon ground cinnamon

*For almond butter cookies, use 2 tablespoons butter and 1/3 cup brown sugar. For peanut butter cookies, use 3 tablespoons butter and 1/2 cup brown sugar.  For either kind of cookie, reduce sugar by a few tablespoons if your nut butter already contains sugar.

Pre-heat oven to 325 F. Line a cookie sheet with parchment paper. If using natural peanut butter, give it a good stir.  In a large bowl, mix first four ingredients plus the extract with a spatula until smooth, pasty and completely even in color.  Add the flour (do not sift unless it’s particularly lumpy), salt and cinnamon, mixing until no traces of flour remain and dough holds together.  It may be easiest to use bare hands for this step.

Nut butter cookiesMake little balls of dough that are  smaller than a tablespoon (about half an ounce) a piece; you should have 25-30 cookies.  Place them on prepared cookie sheets.  For peanut butter cookies, indent with a fork, bracing the sides of the cookie to prevent cracking.  Almond butter doesn’t hold its shape as much but still needs to be pressed down for even baking, so use your thumb or the back of a spoon, adding an almond on top if you’d like.  Bake cookies for 10-12 minutes.  Remove from oven and be sure to let cookies sit on hot cookie sheets for 10-15 minutes before touching or moving.  With the mouthwatering aroma in your kitchen, this last act can be the hardest part.

Nut butter cookies (2)With their trace of cinnamon, their moist brown sugar and their high share of nut butter, these little cookies pack a rich and flavorful bite in a soft and tender form.  By avoiding electric beaters, sifted flour and egg whites, the dough is dense and delicious.  And with this recipe’s simplicity and ease, you just might make both types — almond and peanut — in one scrumptious session.

Nut butter cookies (5)Maybe next time… Though I haven’t tried it yet, I have a hunch that these cookies would take well to gluten-free flour.  Either type would be delicious with chocolate chips or dipped in melted chocolate, just as they’d both make great mini-ice cream sandwiches.  Peanut butter cookies hold indentations well, so get creative with what you press into them: perhaps a meat tenderizer for checkered look, or a heart-shaped stamp for extra sweetness.  You can even fill your indention with jam or melted chocolate like I did here.

Nut butter cookies (6)A final thought:  A place and time exists for all kinds of cookies, even the versions of peanut and almond butter cookies I personally never crave.  Just as there are strong and opposed opinions about how smooth or chunky a nut butter should be, so are there ardent feelings about the perfect qualities of its cookie form.  I realize my cookies might not meet your ideals. Moreover, as happy as I am with the above recipe, I can see myself playing with it even further in the future; after all, the possibilities in this sensational sweet world are nearly never-ending…

Posted in Cookies & Bars, Sweets | Tagged , , , , , , , , | 11 Comments